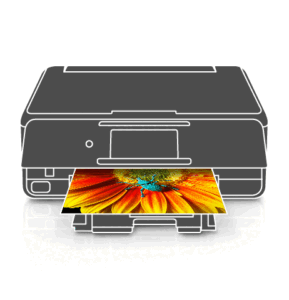
CANON PRINTER SETUP,SUPPORT & TROUBLESHOOTING

PRINT FROM DIGITAL CAMERA

Canon printers are smart younger generation printers with which your print jobs from digital cameras are too simple. It is followed by the installation of your canon printer, connecting your canon printer to the digital camera and lastly printing from your digital camera to your canon printer as follows;

  • Unbox your canon printer.
  • Remove the packing materials and install the print heads.
  • Fill ink in the ink tanks and then load enough number of papers in the paper tray.
  • Connect the power cable to your canon printer and to the electrical outlet.
  • Power on your canon printer. For doubts on canon printer setup, click on canon setup.
  • Power off your digital camera.
  • Once your canon printer is ready, connect the USB cable to the digital camera and to your canon printer.
  • If you have connected the USB cable properly, your digital camera will power on automatically. If your digital camera did not turn on, please switch on your digital camera.
  • If the connection is properly made, the direct printing icon will be displayed in your digital camera’s screen. If the option does not display, unplug and reconnect the USB cable.
  • Now, select the photo you want to print from your digital camera.
  • Change the print setting, style of your photo and provide your paper size, bordered or borderless and other information.
  • Then, click on print and then select set to print your photo to your canon printer. For more information you can contact our canon support.

PRINT USING A USB CONNECTION

  • Unbox your canon printer.
  • Remove the packing materials and install the print heads.
  • Fill ink in the ink tanks and then load enough number of papers in the paper tray.
  • Connect the power cable to your canon printer and to the electrical outlet.
  • Power on your canon printer and setup physically. Now, power off your canon printer.
  • Switch on your computer.
  • Install the CD/DVD that contains your canon printer’s drivers and softwares in your computer.
  • Download and install the drivers and softwares of your canon printer.
  • Choose connect printer via USB cable and follow the onscreen instructions.
  • When the canon printer connection screen appears, connect the USB cable to your canon printer and to the driver installed computer. Do not connect the USB cable before the computer screen prompts.
  • When the print head alignment screen appears, open the paper support.
  • Open the feed slot cover and adjust the paper width guides.
  • Install the sheets of paper in the input tray of your canon printerand adjust the width guides. Do not adjust the width guides too tightly, as it may damage the print quality.
  • Then, close the feed slot cover and open the output tray extension.
  • Click on execute and in the start print head alignment screen, click on align print head.
  • The print head alignment will take 7- 8 minutes.
  • Click agree to install the extended survey program.
  • When the installation completed successfully screen appears, click exit to complete the installation.

Your canon printer is successfully connected to the computer via USB cable. For more information, click on canon printer support.

CANON PRINTER FEATURES

Canon PIXMA printers are designed compact and easy to carry. These slim fit canon PIXMA can easily fit into a minimum space and so you can place anywhere. The AUTO POWER ON feature detects the USB cable connection automatically at once it is connected. Canon PIXMA printers are the famous printers for its adorable and sleek design. These canon PIXMA printers can print 7 black pages per minute and 4.5 colour pages per minute. You can use A4 sheets, A5 sheets, B5 sheets, envelopes and plain sheets.

    Canon Laser Printers can print crisp and clear documents beyond your expectations. These canon laser printers can print presentations at the rate of 12 pages per minute on A4 size paper. The printed documents and images comes at a resolution of 600 x 600dpi. With the Automatic Image Refinement Technology, this printer allows smoothing up to a resolution 2400 x 600 dpi to deliver high-quality printouts quickly. This printer makes use of Canon Cartridge 303 that can print up to 2000 A4 pages. Canon’s On-demand Fixing Technology ensures quick transfer of heat to deliver faster print outputs and also saves power costs.

   Canon Inkjet printers are capable of printing, scanning and copying. These canon inkjet printers can also print borderless prints beyond your imagination. You have automatic power on/off feature which is to reduce unnecessary power consumption. These canon inkjet printers are capable google cloud print, apple air print and Wi-Fi direct connectivity. You can easily print photos using PIXMA easy photo print.

The classes are:

CANON PRINTER WIRELESS SETUP

  • Unbox your canon printer.
  • Remove the packing materials and install the print heads.
  • Fill ink in the ink tanks and then load enough number of papers in the paper tray.
  • Connect the power cable to your canon printer and to the electrical outlet.
  • Power on your canon printer. For doubts on canon printer setup, click on canon setup.
  • Switch on your computer.
  • Connect your computer to a wireless network connection.
  • Install the software installation CD/DVD of your canon printer in your computer and download and install all the necessary drivers and softwares in your computer.
  • Always download the latest drivers and softwares for your canon printer to make it work faster.
  • Agree to the licence agreement and also agree to the extended survey program for your canon printer.
  • Select your network connection method and follow the on screen instructions.
  • At once installation is completed, click next.
  • Click on wireless button in your canon printer.
  • When the print head alignment screen appears, open the paper support.
  • Open the feed slot cover and adjust the paper width guides.
  • Install the sheets of paper in the input tray of your canon printerand adjust the width guides. Do not adjust the width guides too tightly, as it may damage the print quality.
  • Then, close the feed slot cover and open the output tray extension.
  • Click on execute and in the start print head alignment screen, click on align print head.
  • The print head alignment will take 7- 8 minutes.
  • Then, take test print if you want. Your canon printer is wirelessly setup and you can enjoy printing wirelessly from your driver installed computer.

CANON PRINTER PRINT AN IMAGE FROM THE MEMORY CARD

  • Unbox your canon printer.
  • Remove the packing materials and install the print heads.
  • Fill ink in the ink tanks and then load enough number of papers in the paper tray.
  • Connect the power cable to your canon printer and to the electrical outlet.
  • Power on your canon printer. For doubts on canon printer setup, click on canon setup.
  • Switch on your computer.
  • Connect your computer to a wireless network connection.
  • Install the software installation CD/DVD of your canon printer in your computer and download and install all the necessary drivers and softwares in your computer.
  • Always download the latest drivers and softwares for your canon printer to make it work faster.
  • Agree to the licence agreement and also agree to the extended survey program for your canon printer.
  • Select your network connection method and follow the on screen instructions.
  • At once installation is completed, click next.
  • Click on wireless button in your canon printer.
  • When the print head alignment screen appears, open the paper support.
  • Open the feed slot cover and adjust the paper width guides.
  • Install the sheets of paper in the input tray of your canon printerand adjust the width guides. Do not adjust the width guides too tightly, as it may damage the print quality.
  • Then, close the feed slot cover and open the output tray extension.
  • Click on execute and in the start print head alignment screen, click on align print head.
  • The print head alignment will take 7- 8 minutes.
  • Then, take test print if you want. Your canon printer is wirelessly setup and you can enjoy printing wirelessly from your driver installed computer.
DRIVER DOWNLOAD
MANUALS DOWNLOAD
CANON PRINTER SOFTWARE INSTALL
CANON PRINTER WIRELESS SETUP
CANON PRINTER TROUBLESHOOTING

19,90$

Starting Price

7 Days

a week open

87 Studios

around the world

CANON PRINTER TROUBLESHOOTING

  • If your canon printer did not start or irresponsible, do not panic or do not go on for servicing. Simply, plug out and plug in the power cord of your canon printer. Switch on your canon printer again.
  • If your canon printer is not able to connect to your computer, please remove the USB cable and reconnect it. Also, if your canon printer is not displayed in your computer, go to printers and faxes in your computer’s control panel. Then, click on add printer and add your canon printer to the printer list and start printing.
  • To enjoy quality printing, always download and install the latest canon printer software. If you have downloaded the canon printer software using the software CD provided along with your canon printer, always update the software. This will make you enjoy new advanced printing features for your canon printer model.
  • While printing an image from your memory card, insert your memory card in the memory card slot carefully. Do not try to print from a damaged memory card. It may damage your canon printer too. If your canon printer do not lit the indication light at once you insert the memory card, reinsert the memory card again. If the problem still persists, then try a different memory card.
  • To get rid of any of the problems with your canon printer, you can get help from the canon printer support.